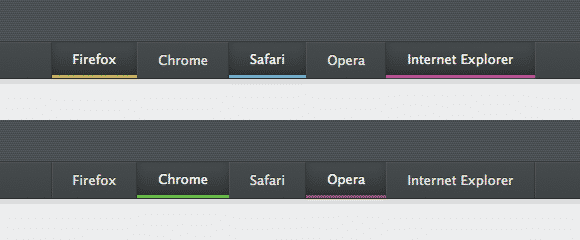
In this week's tutorial we'll teach you how to Create a CSS3 Dark Navigation Menu Tutorial set with beautiful set with hover and active states.. We'll be learning how to Create a Dark Navigation Menu Tutorial using CSS3 and HTML by taking you step by step through the code and breaking it down for you.
When designing a website, some designers tend to lose creativity when it comes to navigation menus. Dark Navigation Menus are popular on websites, usually light colored layout websites use dark navigation menus to balance the website's color scheme. We'd like to say special thanks to Dark Navigation.
More Navigation Articles:
- Create a Pure CSS3 Drop Down Menu Tutorial
- 55+ Best CSS3 jQuery Plugin Menus
- Create a Vertical Accordion Menu using CSS3 Tutorial
- Create a CSS3 Top Navigation Bar Tutorial
HTML Structure
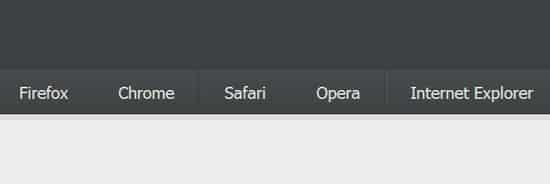
Let's begin with a quick html structure of the Navigation bar. We'll have the navigation as a header and place all the navigation contents in a container inside a <nav> id. The menu items are inside an unordered list. Each menu link will appear as an <li> with a nested anchor element.
<header>

    <nav>

      <div class="container">

        <ul>

          <li class="yellow"><a href="index.html">Firefox</a></li>

          <li class="green"><a href="index.html">Chrome</a></li>

          <li class="active"><a href="index.html">Safari</a></li>

          <li class="red"><a href="index.html">Opera</a></li>

          <li class="purple"><a href="index.html">Internet Explorer</a></li>

        </ul>

      </div>

    </nav>

  </header>
MIT License
CSS Styling
Now we can begin styling this css3 dark navigation menu. The bar itself will have a background gradient, bottom border and the position will be fixed. We've got a padding-top of 100px (you can change this), a background set to an image or color if the image isn't available and a bottom border.
header {

  padding-top: 100px;

  background: #3d4144 url("../img/bg.png") 0 0 repeat;

  border-bottom: 5px solid #ddd;

}

We want the menu items to be centered. To do this add in the styling for the container.
.container {

  margin: 0 auto;

  width: 540px;

}
Now for the menu items, for the first nav id will be styling the navigation menu. Next will be adding in a [a] tag to the nav for the link styling. We'll be adding in some transition effects.
nav {

  height: 36px;

  background: #464b4c;

  border-top: 1px solid #353939;

  border-bottom: 1px solid #2e3131;

  background-image: -webkit-linear-gradient(top, #464b4c, #3f4344);

  background-image: -moz-linear-gradient(top, #464b4c, #3f4344);

  background-image: -o-linear-gradient(top, #464b4c, #3f4344);

  background-image: linear-gradient(to bottom, #464b4c, #3f4344);

  -webkit-box-shadow: inset 0 1px rgba(255, 255, 255, 0.06);

  box-shadow: inset 0 1px rgba(255, 255, 255, 0.06);

}

nav a {

  -webkit-transition: 0.1s ease-out;

  -moz-transition: 0.1s ease-out;

  -o-transition: 0.1s ease-out;

  transition: 0.1s ease-out;

  -webkit-transition-property: background-color, line-height;

  -moz-transition-property: background-color, line-height;

  -o-transition-property: background-color, line-height;

  transition-property: background-color, line-height;

}
We want to make the unordered list aligned, to do this, make the nav ul and li float left and add in some border styles.
nav ul {

  float: left;

  border-left: 1px solid #353939;

  border-left: 1px solid rgba(0, 0, 0, 0.2);

  border-right: 1px solid #4d5354;

  border-right: 1px solid rgba(255, 255, 255, 0.06);

}

nav li {

  float: left;

}

We'll add the styles using nav a and nav a:link tags. Anything that's a link inside of the [nav] tag will have these basic styles.
nav a {

  display: block;

  padding: 0 20px;

  line-height: 36px;

  color: #ddd;

  text-decoration: none;

  text-shadow: 0 -1px #2e3131;

  border-left: 1px solid #4d5354;

  border-left: 1px solid rgba(255, 255, 255, 0.06);

  border-right: 1px solid #353939;

  border-right: 1px solid rgba(0, 0, 0, 0.2);

  cursor: pointer;

}

nav a:hover {

  background: #4d5354;

  background: rgba(255, 255, 255, 0.05);

}
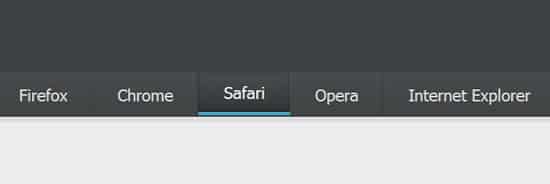
Now we want to have a standard active state for the menu. We'll be adding a darker gradient for the background along with some shadow effects, padding and making it have a blue bottom border active state.
nav li.active a, nav li.active a:hover, nav a:active {

  padding: 0 21px;

  line-height: 33px;

  color: #eee;

  background: #323637;

  border-left: 0;

  border-right: 0;

  border-bottom: 3px solid #48a9c0;

  background-image: -webkit-linear-gradient(top, #484e4f, #323637);

  background-image: -moz-linear-gradient(top, #484e4f, #323637);

  background-image: -o-linear-gradient(top, #484e4f, #323637);

  background-image: linear-gradient(to bottom, #484e4f, #323637);

  -webkit-box-shadow: inset 0 -1px #151717, inset 0 -1px 8px rgba(0, 0, 0, 0.2);

  box-shadow: inset 0 -1px #151717, inset 0 -1px 8px rgba(0, 0, 0, 0.2);

}
If you look at the HTML Structure you'll see that each li link have their own class. To set each link item to a certain color, you can add in these css classes.
nav li.green a, nav li.green a:active {

  border-bottom-color: #56c93d;

}

nav li.red a, nav li.red a:active {

  border-bottom-color: #a54e49;

}

nav li.purple a, nav li.purple a:active {

  border-bottom-color: #c052b9;

}

nav li.yellow a, nav li.yellow a:active {

  border-bottom-color: #c0bb30;

}