Bookshelves are usually found in most homes, they’re great for keeping our books in place for when we’re ready to read them. Bookends are an essential part of a bookshelf and stops the books from falling down. Instead of buying a plain and boring bookend why not get creative and try out one of these 25Â Gorgeous DIY Bookends For Your Shelves!
A bookend is an object that is designed to buttress, or support, an upright row of books. It is placed on either end to prevent books from falling over, such as in a half-filled bookshelf. Bookends are both utilitarian and, often, decorative. They are common in libraries and in homes. Heavy bookends have been used for centuries; the simple sheetmetal bookend was originally patented in the 1877 by William Stebbins Barnard, and uses the weight of the books themselves to make an anchor.
Packed with some wonderful bookend ideas like homemade beanbags, diy vintage phone bookends or even old license plates. These do-it-yourself bookends can really help adding some spice to your decor!
Vintage kitchen rolling pin DIY bookends
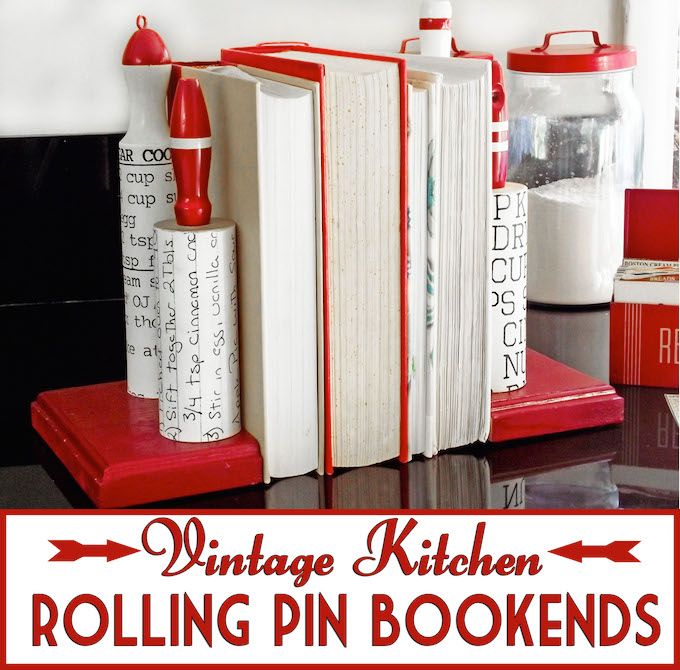
You can make DIY bookends out of almost anything, but this vintage rolling pin version is particularly charming. Looks great in a kitchen!
DIY Bookends: Fabric Covered Monogram
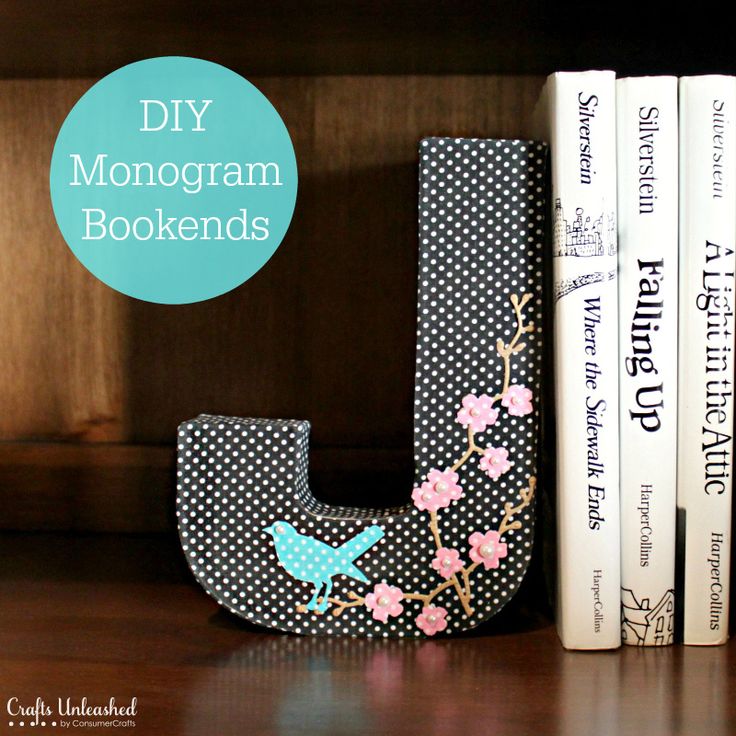
Learn how to make your own custom fabric covered monogram DIY bookends. It’s so fun to create & self stick fabric sheets make this project a breeze!
Woodland Dioramas
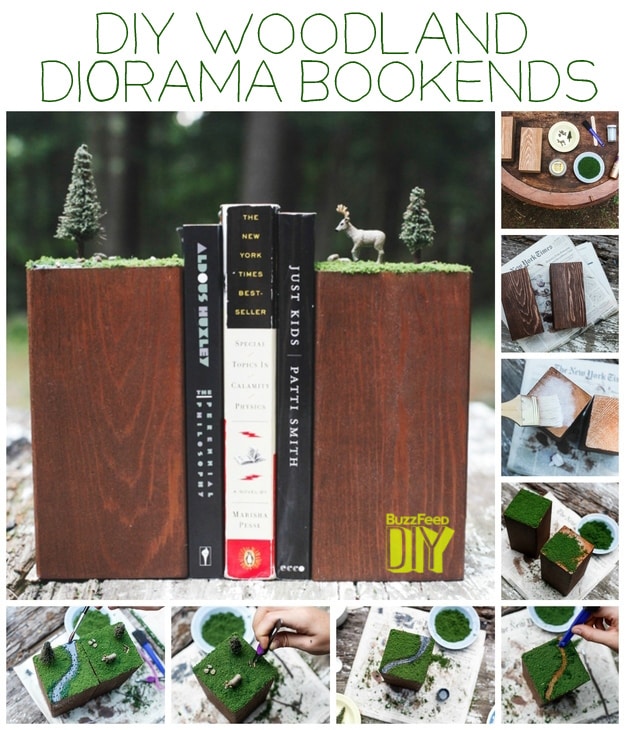
Make these Anthropologie bookends, which cost $168, with just $40 worth of materials easily available at a hardware store or Hobby Lobby. Erick and Emily from Hello Home Shoppe show us how.
Materials: two wooden blocks approximately 8 inches tall and 4 inches in diameter (you can have them cut specially at the hardware store), newspaper, chestnut-colored wood stain, tacky glue, a paintbrush, faux grass (available at craft stores), assorted pebbles and stones, assorted faux conifer tree figures, small plastic woodland figurines, and a Scene-A-Rama water kit (optional).
1. Spread out newsprint on your work surface. Using either a clean cloth or a paintbrush, begin to stain your wood blocks by gently applying the stain in the direction of the wood on all 4 vertical sides of the blocks. You can stain the bottom of the blocks if you choose but don’t stain the top. No need for a second coat — one should do it. Let dry for a couple hours.
2. Once your blocks are dry, create a mixture of tacky glue and water in a bowl. Using a paintbrush, paint the glue mixture on the top of the block that has not yet been stained.
3. While the glue is still wet, sprinkle on the faux grass. Press down lightly with your finger to adhere. Let dry a few hours.
4. If you wish to add a stream to your bookends, scrape off the grass using a blunt object (we used the end of a foam brush) until you reach your desired stream shape. Add a thin layer of glue to the outside border of your stream on both sides to create a seal when you add the water.
5. Paint on the water undercoat that comes with the Scene-A-Rama kit in the area where you scraped off the grass. If you don’t have the kit, you can use thick acrylic blue paint instead. You can also add small pebbles on top of the undercoat to look like stones submerged in the water.
6. While the undercoat dries, start gluing down your animal figurines, pebbles, and trees in your desired location. Tweezers may come in handy during this step for holding the figures in place while the glue dries.
7. Once the water undercoat is dry, apply the realistic water effect that comes with the Scene-A-Rama kit. Let dry a few hours. If desired, once this layer is dry, add the water ripple special effect (the last layer in the kit).
8. Add a few more pebbles/whatever finishing touches you may have and let the bookends dry a few more hours before use.
All set!
Polka Dot Geos
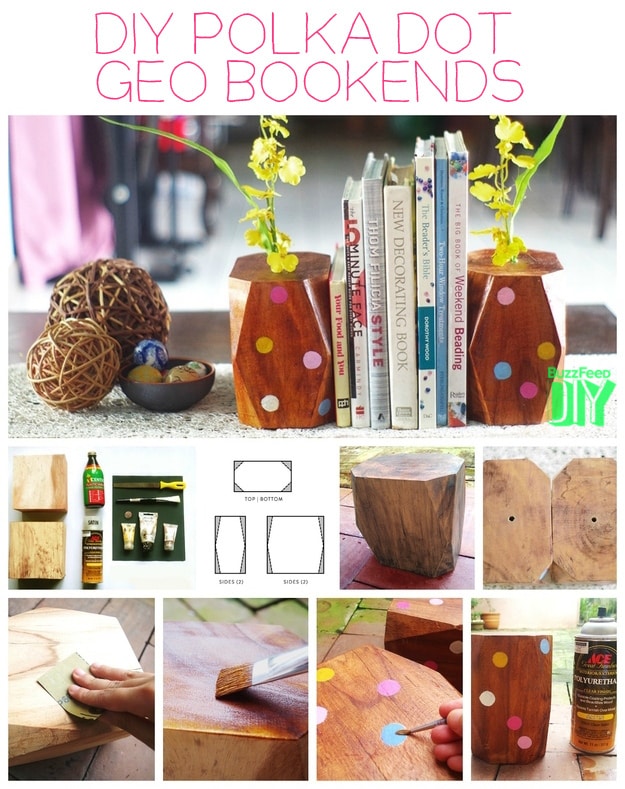
These adorable bookends were created by Allie at Four Eyed Wonder.
Materials: two solid wood blocks (approximately 6†x 6†x 4â€), fine grit sandpaper, a paintbrush, a file, wood stain (optional), acrylic paint in various colors, a coin or circle template, polyurethane spray, a hand sew or electric sew, a drill.
1. Following the diagram shown, ark each face of your wood block and cut along those guidelines using your sew to form your geometric shapes, removing a triangular piece from each corner of your block.
2. If you plan to use your bookends to hold flowers, drill a hole of sufficient size on the top face of each block, at least one-third of the height.
3. Sand your wood blocks carefully to make them smooth, including all sharp corners and edges. You can also use a file for any extremely uneven portions.
4. You can apply wood stain to your sanded wood blocks if you have a preferred color or shade. Then sand again as necessary.
5. Using a small coin as your guide, lightly draw random circles on each face your block to form a polkadot pattern, then paint freehand using acrylic. You can also use a circle template if you have one to avoid pencil marks.
6. Spray two to three coats of polyurethane to seal your paint and give your bookends a nice, even finish.
Fill with flowers if you like, and you’re good to go.
Starry Tea Light Votives
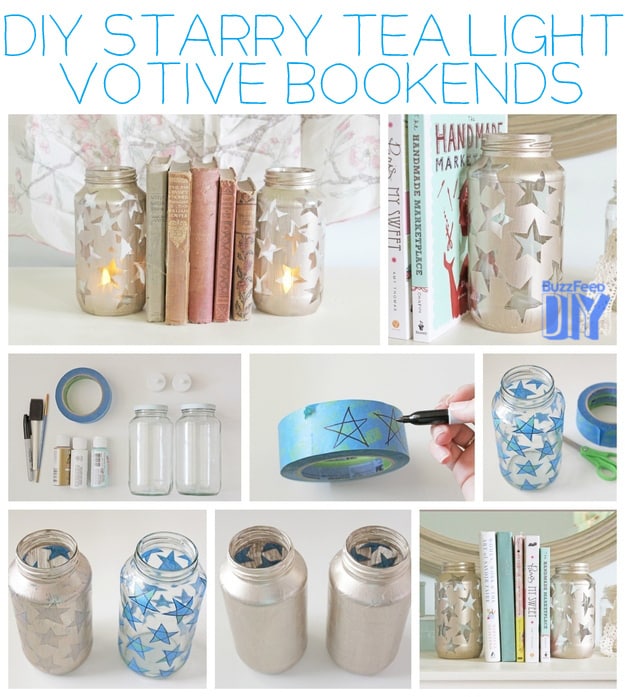
Jordan at Stellaire crafted these chic candle votive bookends.
Materials: two glass jars, ceramic or specialty paint (that will adhere to glass), painter’s tape, paint brushes, a marker, and battery powered tea lights (so you don’t start a fire.)
1. Decide on a shape to decorate your jar. These will be the bare spots where the light from the candle will shine through. Draw your shapes on painter’s tape and cut them out.
2. Arrange your painter’s tape stickers on your jar to prepare it for painting.
3. Paint a few coats over the entire jar, letting each coat dry before you do the next one.
4. When your jars have completely dried, carefully remove the stickers. If you are having trouble removing them cleanly, use an exacto knife to trace around the edges of the sticker before you pull it off.
Put your tealights in the jars and you’ve got bookends that are also great for ambiance.
Glitter Rocks
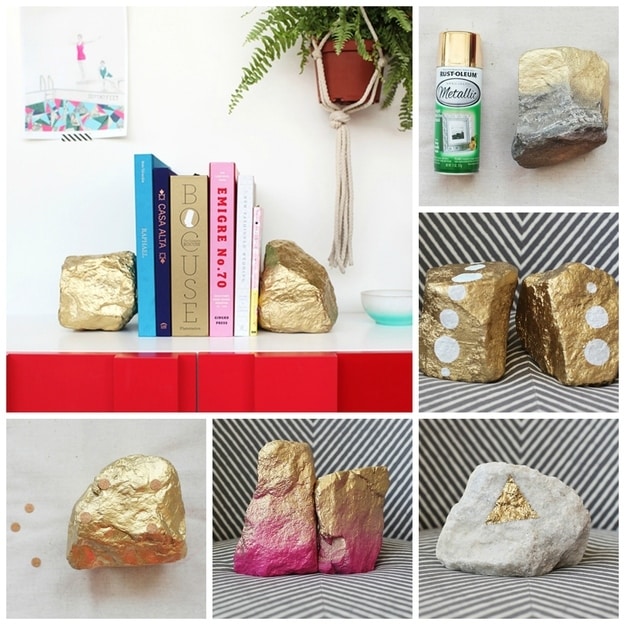
Spray paint rocks with a metallic color. You can cover them completely, create patterns, or mix it up with two different hues. Check out this tutorial.
Book Bricks
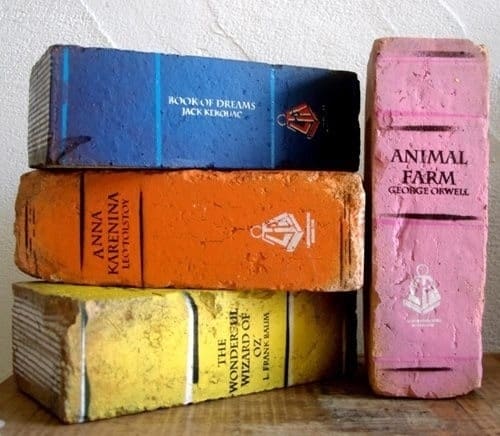
Copy the bookends in this pin by painting bricks to look like old books. Acrylic paints work just fine on stone.
Vintage Phones
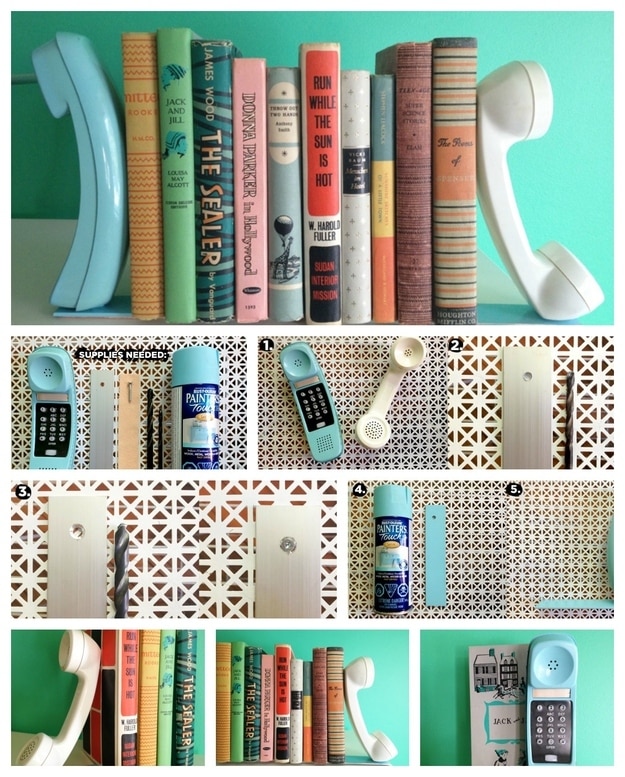
This post shows you how to upcycle old phones by attaching them to a spray-painted metal base.
Bean Bags
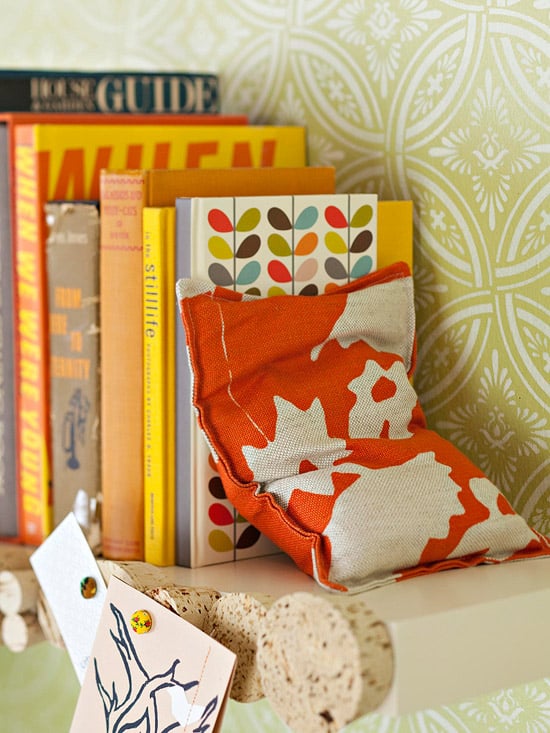
Cut two rectangles of pretty fabric and sew them together to create a little pillow. Fill with sand, sew it shut, and you have a cushy but sturdy bookend, like these.
Honey Bears
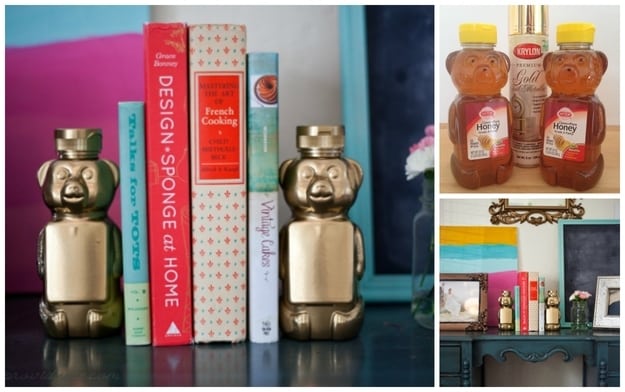
Coat honey bears with gold spray paint. You can keep them full of honey so they’re heavy (and because apparently honey never goes bad) or use up the sweet stuff inside first and fill them with sand. Created by this blogger.
Plastic Elephants
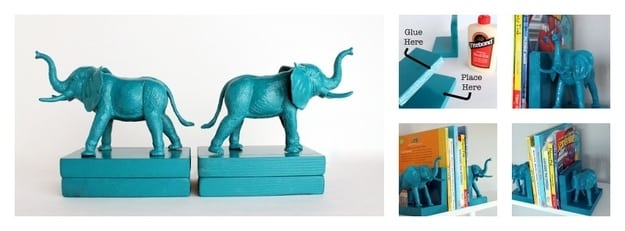
Spray paint plastic animals and wooden blocks in matching colors, then glue together. Check out these quick directions.
Pile of Gold
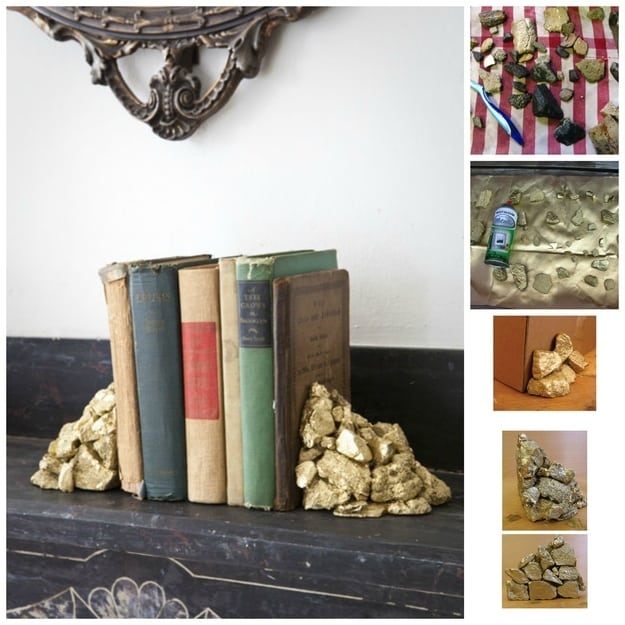
Spray paint lots of little rocks, then glue them together into piles with one flat side. Follow this tutorial.
Clay
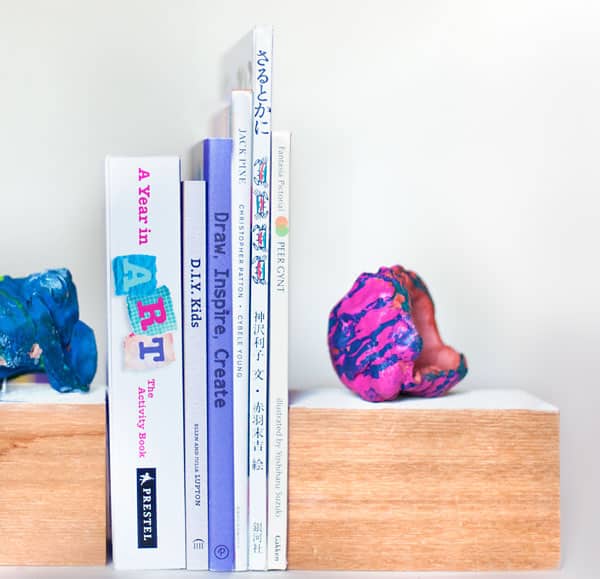
Splatter paint a chunk of clay and glue it atop a wooden block for an abstract art-like bookend. Get the details here.
Mason Jar Vases

Fill mason jars with water and pretty flowers, as done here. Just make sure your vases are heavy enough so that they don’t tip over.
Dipped Bricks
Spray paint uneven bricks gold, then mark off the bottom with painter’s tape and paint it a contrasting color, like this blogger.
Rope Knot
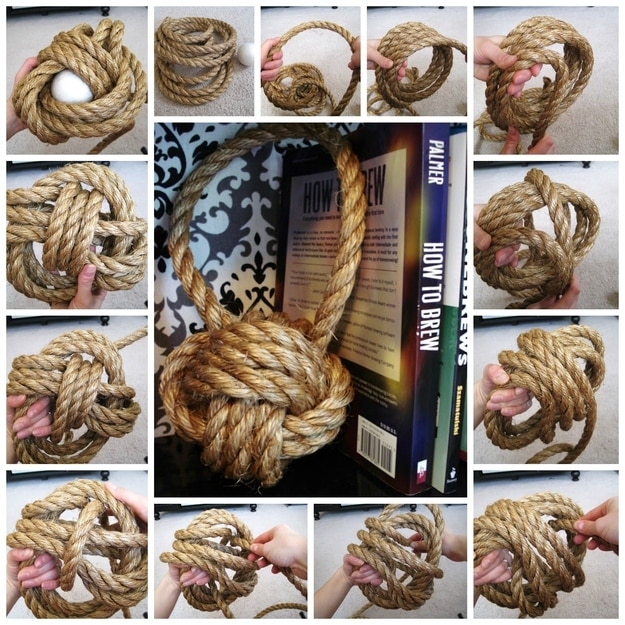
Follow these step-by-step directions (and good luck) to create a big rope knot that makes for a great textured bookend. Use a tennis ball filled with rocks as the center for extra weight.
Neon Animals
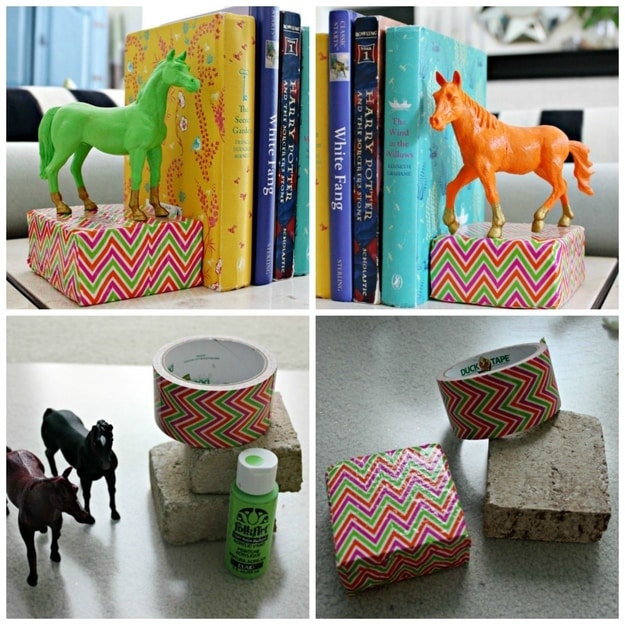
Paint animal figures in bright neon hues, then attach them to a stone base covered with decorative tape. Check out this tutorial.
Direction Signs
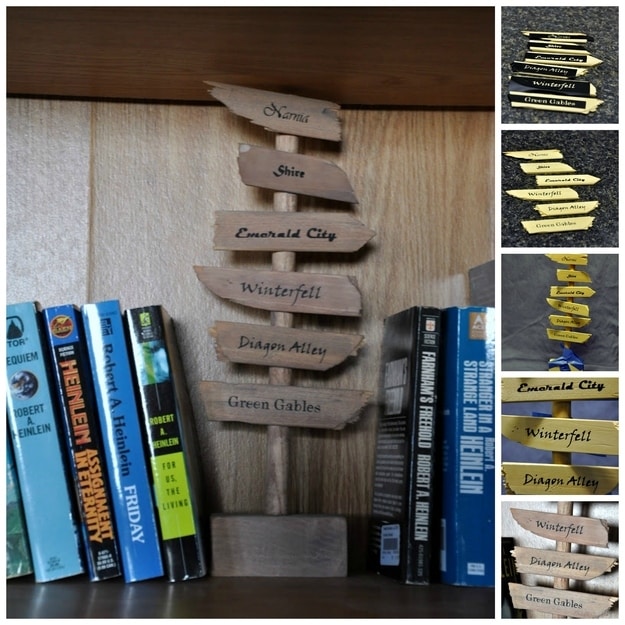
Write literary destinations onto broken bits of wood, glue them to a wooden post, and coat with a thin layer of gray-brown paint for an aged look. Get all the directionshere.
Concrete Initial
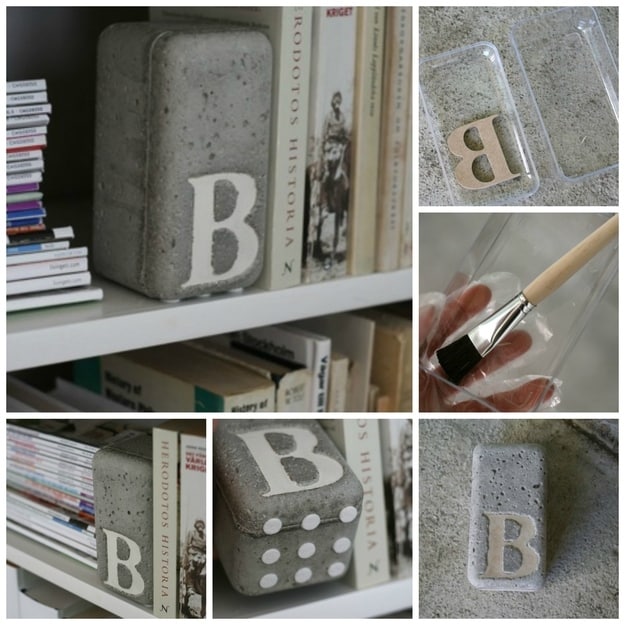
Place an MDF letter into a plastic container, fill with concrete, and let it dry. Coat the container with vegetable oil to make removal easier. You can stick felts on the bottom to avoid scratching. This tutorial has all the details.
Faux Zinc Punctuation
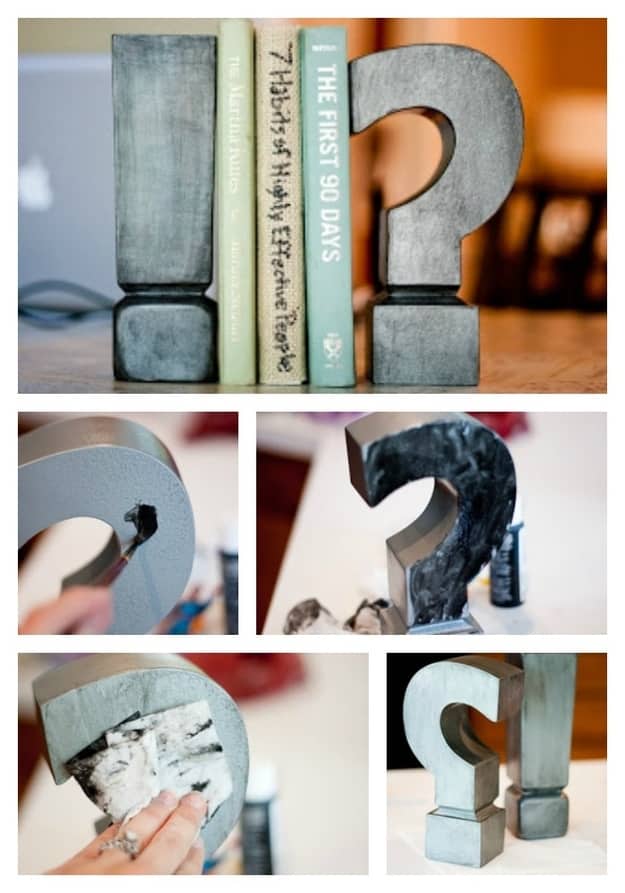
Spray paint a boring material with rustoleum hammered aluminum spray paint and then glaze them with black acrylic paint mixed with water. Here’s how.
License Plates
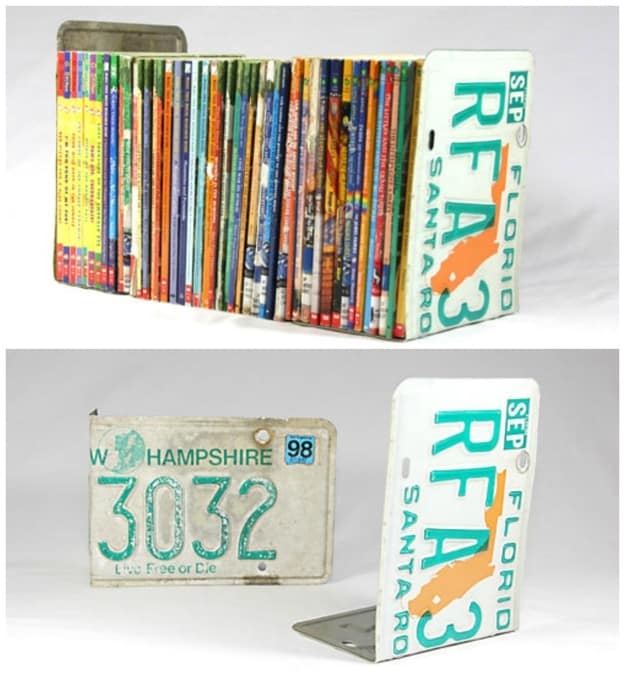
Simply bend the end of a license over the edge of a table. Easy. These were created by this resourceful lady.
Baseball
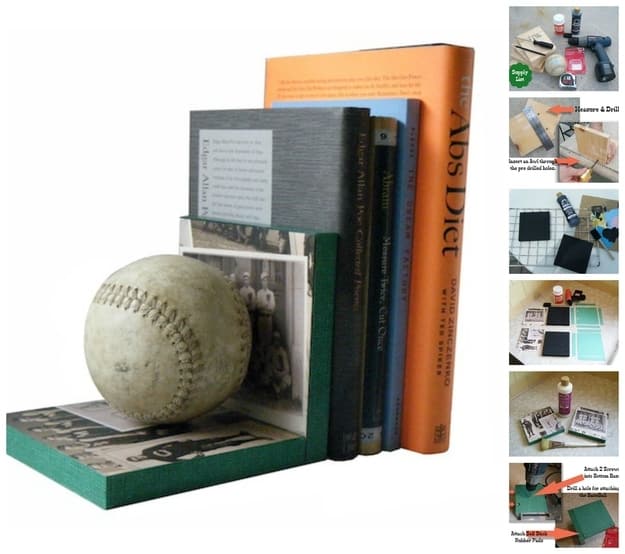
This tutorial shows you how to create decoupaged wooden bases for a baseball bookend. Great for a boy’s room or man cave.
Lace Silhouette
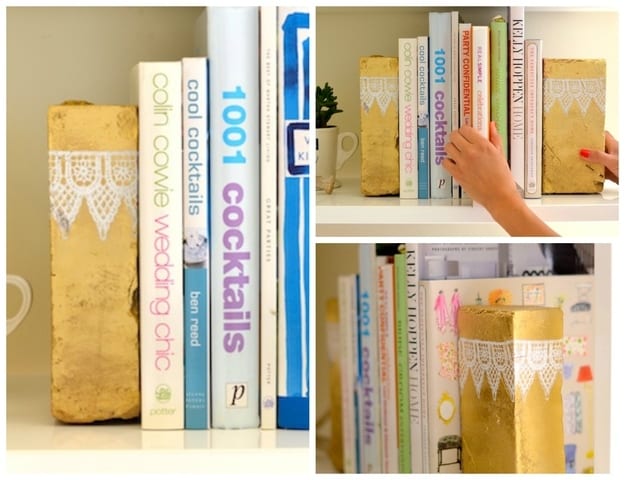
Spray paint the top of a brick white, adhere lace around it, spray with gold, allow to dry, and remove the lace so the pattern remains. Go here for the tutorial.
Neon Wrapped Letters
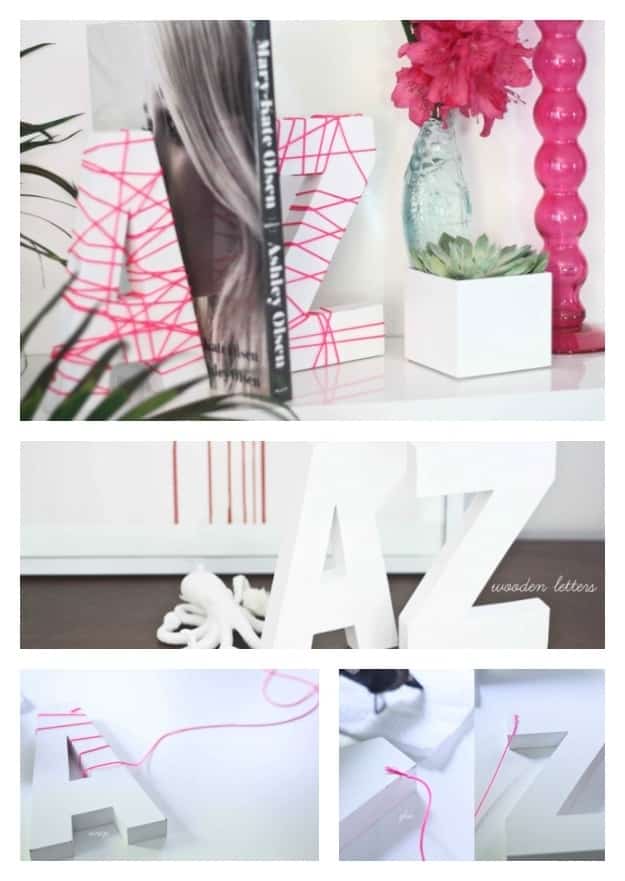
Wrap letters (these were $4 each from Walmart) in neon string. Quick and easy. Get the details here.
Fabric Wrapped Brick
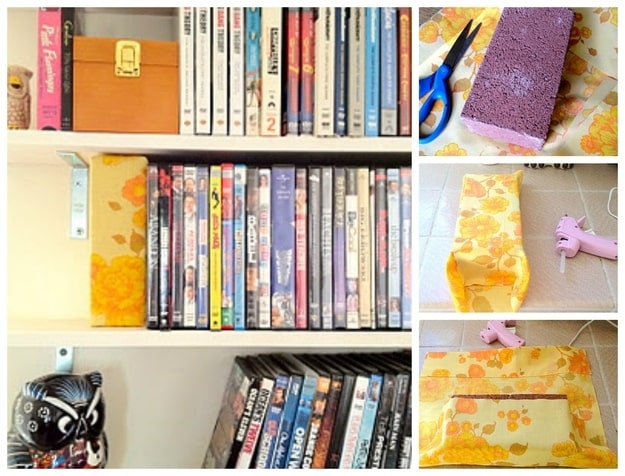
Wrap a brick like you’d wrap a present, but with fabric and a hot glue gun. That’s it.This blogger had the bright idea.
via BuzzFeed