Create a Packet of Potato Chips in Photoshop
Learn how to create a mouth watering Packet of Potato Chips in Photoshop!
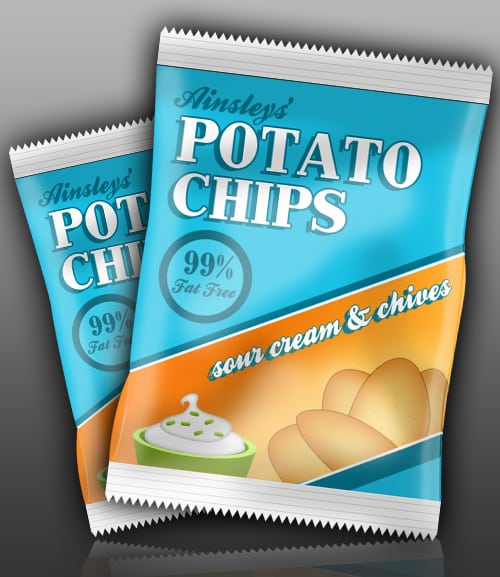
Final Result
1. Create a new document that’s 500×577. Next go into View > Show > Grid (or ctrl+ ‘ ).  2. Using the colour #18c0e4 and the pen tool draw the basic shape of the packet like below.
  3. Using the rectangle tool draw the white bottom & top part of the packet. Next create a new layer for the background, fill it with white, right-click & go into Blending Options. Go into Gradient Overlay and put in a Linear Gradient using the colours below.
  4. Go into Custom Shapes and select the triangle. Hold down shift (this will make the shape stay perfect) & make a small triangle shape. Drag the shape into the New Layer icon to duplicate, so this until it goes all across the top. Do the same thing to the bottom but press ctrl+t to turn the shape upside down. Next put all the triangle shapes into a folder, right click and Convert to Smart Shape, then right click & Rasterize Layer. Next get the line tool (1 px), hold down shift and draw a horizontal line using the grey colour below, duplicate the line 3 times & have it like below. Do this for the top & bottom.
  5. Using the pen tool draw a shape like below across the packet. Right Click into Blending Options > Gradient Overlay and put in the settings below:
  6. Get the line tool (3 px) & draw 2 lines on the top & bottom of the shape.
  7. Using the font JohnHancockCP write out the name in White, go into blending options and put in the settings below:
  8. Next using the font Ballpark write out any flavour you want! My favourite is Sour Cream & Chives 🙂 Press ctrl+t to rotate the font like below, go into blending options & put in the same options as the ‘Potato Chips’ Heading.
  9. Create a new document that’s 600×600 pixels, get the pen tool & draw chip shape. Go into blending options and put in the options below. Create a new layer get a hard edged 5px brush and put dots on the chip (for the chives look).
  10. Do the previous step 2 more times drawing various sized chips.
  11. Put each chip into a folder, hold down shift and click on all the folders to highlight every chip, & drag them over onto the chip packet. Duplicate the chips & press ctrl+t to rotate each chip & arrange them like below. Once you have the chips the way yo want put all the chips into a folder, duplicate the folder for a spare copy (just in case you want to make any changes). Right click on the folder you’re using and Convert to Smart Object then right click > Rasterize layer. Hold down ctrl & click on the orange shape layer thumbnail to highlight it. Go to the chips layer and press ctrl+x (to cut) & paste them back on the canvas & place them in the right spot.
  12. Highlight the orange shape again, create a new layer, get a large soft edged brush with a 80% opacity & brush on a light glow using the colour below around the chips.
  13. Now get a circle shape and draw an oval using the colour below.
  14. Get the pen tool & draw the bown body, right click into blending options > Gradient Overlay & put in the options below:
  15. Get the circle shape again and draw a oval like below, go into Blending Options > Gradient Overlay & put in the following options:
  16. Get the pen tool and draw the sour cream, go into Blending Options & put i the settings below:
  17. Now for the chives, get the rounded rectangle tool & draw 1 small shape, go into Blending Options > Gradient Overlay & put in the following settings:
  18. Next create 2 new layers with the opacity set to 19% , on one layer using various sized soft edged brushes draw some shadows with a black colour, do the same on the next layer but with the colour white.
  19. Now holding down ctrl+shift select all the layer thumbnails on the layers I have below to highlight the whole packet. Now go to the highlight & shadow layers and cut/paste the back on to the canvas none of the shades/highlights go out of the packet.
  20. Create 2 circles 1 big, 1 small using the colours below. Using the font JohnHancokCP, write out 99% & using the font Ballpark write out fat free.
  21. Put the chip packet into a folder, & duplicate it 2 times. Remove the original folder from view (be clicking on the eye). Right click the other 2 folders & Convert to Smart Object.
  22. Go into Blending Options on both of the layer & an Outer Glow with the settings below. Next press ctrl+t & rotate each layer. To make the back packet smaller, press ctrl+t, hold down the shift key, click on one of the corners and pull down.
  23. Next duplicate the 2 packets, hold down shift and highlight the 2 layer, right click, convert to Smart Object, then right-click & Rasterize Layer. Press ctrl+t and flip the packets upside side, make them look slightly squashed. Then more them underneath the packets for a reflection.
  24. Set the opacity to 47%, get a soft edged eraser tool and erase the bottom of the reflection slightly.
Final Result


