Design a Futuristic Chrome Web Layout in Photoshop
Learn how to design a Dark & Futuristic Chrome style website layout in Photoshop!
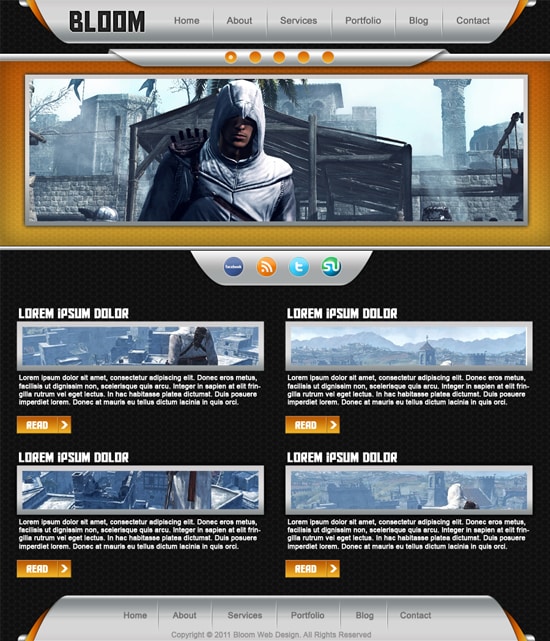
Final Result
1. Firstly download spiderman pattern and install. Create a new document that’s 900×1050 pixels. Double click on the layer to unlock it, then double click again to go into Blending Options and put in the following:

2. Now go to View > Show > Grid (or ctrl+’), grab the pen tool and draw 1 half of the menu shape like below. Duplicate the shape the shape by dragging it to the new layer icon. On the duplicated layer press ctrl+t and flip the shape over like below to create a large shape. To get rid of the grid press ctrl+’
While holding down the ctrl key select the 2 menu layers, right click and Convert to Smart Object to convert it into one shape. Double click the new shape to go into Blending Options and put in the settings below:

3. Next grab the rounded rectangle tool and draw a shape behind the menu bar. Double click to go into Blending Options and put in the settings below:

4. Bring up the grid again (ctrl+’), select the Zoom tool and zoom up to the side of the menu. Using the pen tool draw a shape like below, make sure the shape is between the top menu and bottom shape. Double click the layer and put in the settings below. You can use any colour you want!

5. Duplicate the shape using the previous method and fip over to the other side. You’ll need to go into blending options and reverse the Gradient Overlay Angle.

6. Next press go to the main menu layer, and click on the layer thumbnail while holding down the ctrl key to select the shape. Using the Rectangular Marquee tool, hold down the ALT key and select the top half (this will remove it). While the shape it still highlighted create a new layer and fill the shape while. Set the opacity to 20% on the layer. This will give the menu a nice 3d effect.

7. Using the font Aldo the Apache write out the website name in a dark grey. Double click to go into Blending Options and put in the following settings:

8. Using the line tool (1px) draw a line on the menu bar while holding down the shift key (so the shape keeps straight). Duplicate the shape and move the shape sideways (ctrl+arrow key). Make the lines the colours below. Next while on each line layer press the Add Mask Layer icon.
Next go to each Mask layer and erase the top and bottom of the line using a soft edged brush. This will create a nice looking ‘dent divider’ on the menu.

9. Next write out the menu names using the font below. Duplicate the 2 lines and place them in between the menu names.

10. Using the rectangle tool draw the slider background. Double click into Blending Options and put in the following:

11. Draw another shape on top of the slider background like below. Double click into Blending Options and put in the following:

12. Bring up the grid (ctrl+’) and using the pen tool draw one half of a shape like below. Duplicate the shape and flip it over like the menu shape. Convert the 2 shapes into a Smart Object (like the menu bar). Double click into Blending Options and put in the following:

13. Using the Zoom tool, zoom up to the corners of the previous shape. Using the pen tool draw the corners of the shape using a light grey.

14. Next using the Ellipse tool draw a small circle while holding down the shift key. Double click into Blending Options and put in the following below:
Duplicate the circle across, next draw a smaller circle in the center of one of the circles.

15. Next using the rectangle tool draw a shape for the slider like below in white. Double click into Blending Options and put in the following settings:

16.Duplicate the top silver shape and drag it to the bottom, press ctrl+t and shrink it smaller.

17. Now draw another shape like the menu & slider button tab following the same steps as above.

18. Next download this Social Icon Set and place them on the tab. Double click on each icon to go into Blending Options and put a stroke around it.

19. Next draw a white shape for a post image using the rectangle tool. Double click into Blending Options and put the following:

20. Next write out some example post information.

21. Next create a ‘read’ button using a rectangle tool, double click into Blending Options and put a Bevel & Emboss option. Next using the line tool draw 2 small lines like below. Write out Read in the font Aldo the Apache and get an arrow from Custom Shapes.

22. While holding down the ctrl key select all of the post layers & duplicate the post. Place them neatly on the layout.

23. Next select all of the menu layers (except the text) and duplicate them. Drag them to the bottom of the layout, press ctrl+t and flip it over.

24. Now double click on each layer to go into Blending Options and reverse the Angle of the Gradient Overlay.

25. Now select any image you want for the slider, and place the image just abover the white rectangle slider layer. Right click the image layer and Create Clipping Mask, this will crop the image automatically down to the white rectangle.

26. Do the same step to all of the post example images.

Final Result


