Design a Classy Portfolio Business Layout
Learn how to design a Classy Business layout in Photoshop!
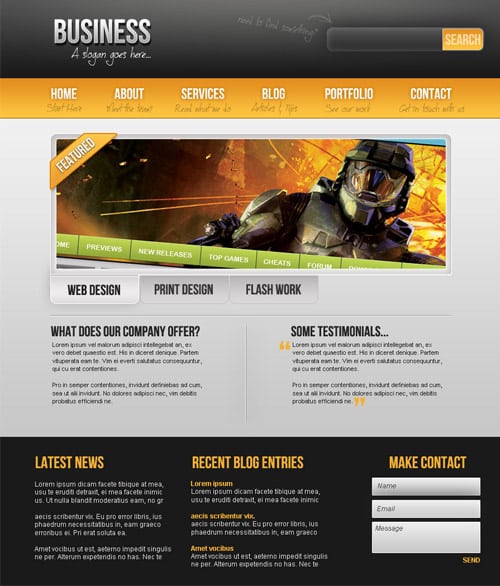
Final Result

1. Create a new document that’s 900×1050. Firstly plan the layout of your website.

2. Next get the rectangle tool and draw the areas. On each layer right-click and go to Blending Options > Gradient Overlay and put in these colours:

3. Next get the Elliptical Marquee Tool and draw a wide oval, create a new layer and fill the shape with white. Go into Blending Options make an outer glow with the settings below. Then move the circle up, until only the outer glow is visible.

4. Next get the font Bebas Neue and type in the business name. In blending options put these settings on the font layer. For the slogan get the font Jellyka CuttyCupcakes and write it in white. Do an Inner Glow instead of an Outer Glow.

5. Get the rounded rectange shape and create the search bar using these blending options below:


6. On the shape layer hold down ctrl and press the box to highlight the shape. Get the Rectangular Marquee Tool, hold down the alt key and remove part of the shape like below. with the new highlighted shape still active, go to Select > Modify & Contract by 3 pixels.

7. Create a new layer and fill the highlighted shape, go into Blending Options and make it the same gradient as the menu bar and put a 1px white stroke around it. Using the same font as the title, write in search and make the opacity 58%
. 
8. Grab any hand drawn arrow from here and copy/paste it onto the canvas. Press ctrl+T to rotate and minimize the arrow pointing to the search bar.

9. On the arrow layer go into Blending Options and make the colour, white. With the slogan font type in the words below and rotate using the previous method. Make the opacity for both of the layers 25%.

10. Now zoom in to the menu bar, get the line tool, hold down shift and draw a straight line going across the canvas. Duplicate the line 2 times and place the three lines like below and make them the colours below:

11. Get the title font and type in the menu names in white. Go into blending options and put in these settings:

12. Using the slogan for type in little phrases for each menu name using the colour black. Make the opacity 33%.

13. Next go to View > Rulers (or ctrl+r), from the ruler frame drag out 2 lines like below to centre the content.

14. Having the ruler lines as a guide, get the rounded rectangle tool and draw a rectangle for the features box. Go into blending options and put in the settings below:

15. With the same settings draw a smaller rectangle and place it underneath like below. On the larger rectangle, right click and rasterize the layer. Get the rectangular marquee tool and remove the bottom of the shape like below.

16. Using the same method create 3 lines, the first going all the way down the features box and the final bottom 2 staying to the width of the smaller shape. Make them the colours below:

17. Duplicate the small rectangle 2 times and put in these settings in Blending Options:

18. Create a shape like below using the rectangle tool with the settings below and rotate the shape. Rasterize the layer and remove the edges with the Rectangular Marquee Tool.

19. Write the word ‘Featured’ with the title font, rotate it, add a slight black>white gradient and drop down shadow in Blending Options.

20. Next get a image from your portfolio, copy and paste it onto the canvas. Rotate it slightly or make it smaller so it fits in the rectangle box.

21. Hold down ctrl and press on the large feature box to highlight the shape. Go to Select > Modify and Contract by pixels, go to the portfolio image, Cut and paste it onto a new layer.

22. Place the image under the feature banner. Place a 1px white stroke around the image. Write in titles on the rectangle buttons with the title font.

23. Using the previous methods put in some lines using the colours below.Write in some text with the title font and arial font. Using the title font and a light orange colour put in some quotation marks around the testimonials.

24. On the footer put in some info using the previous fonts.

25. Get the rectangle tool and create some boxes for the ‘Make Contact’ content using these settings:

26. Write in the box info using the Italic Arial font.

Final Result


