Design a Dark & Minimal WordPress Theme in Photoshop (Free PSD)
In this tutorial we’ll be learning how to design a dark & minimalist WordPress Theme using Adobe Photoshop. We’ll be using many tools & methods including shapes, blending options and text tools.
Resources
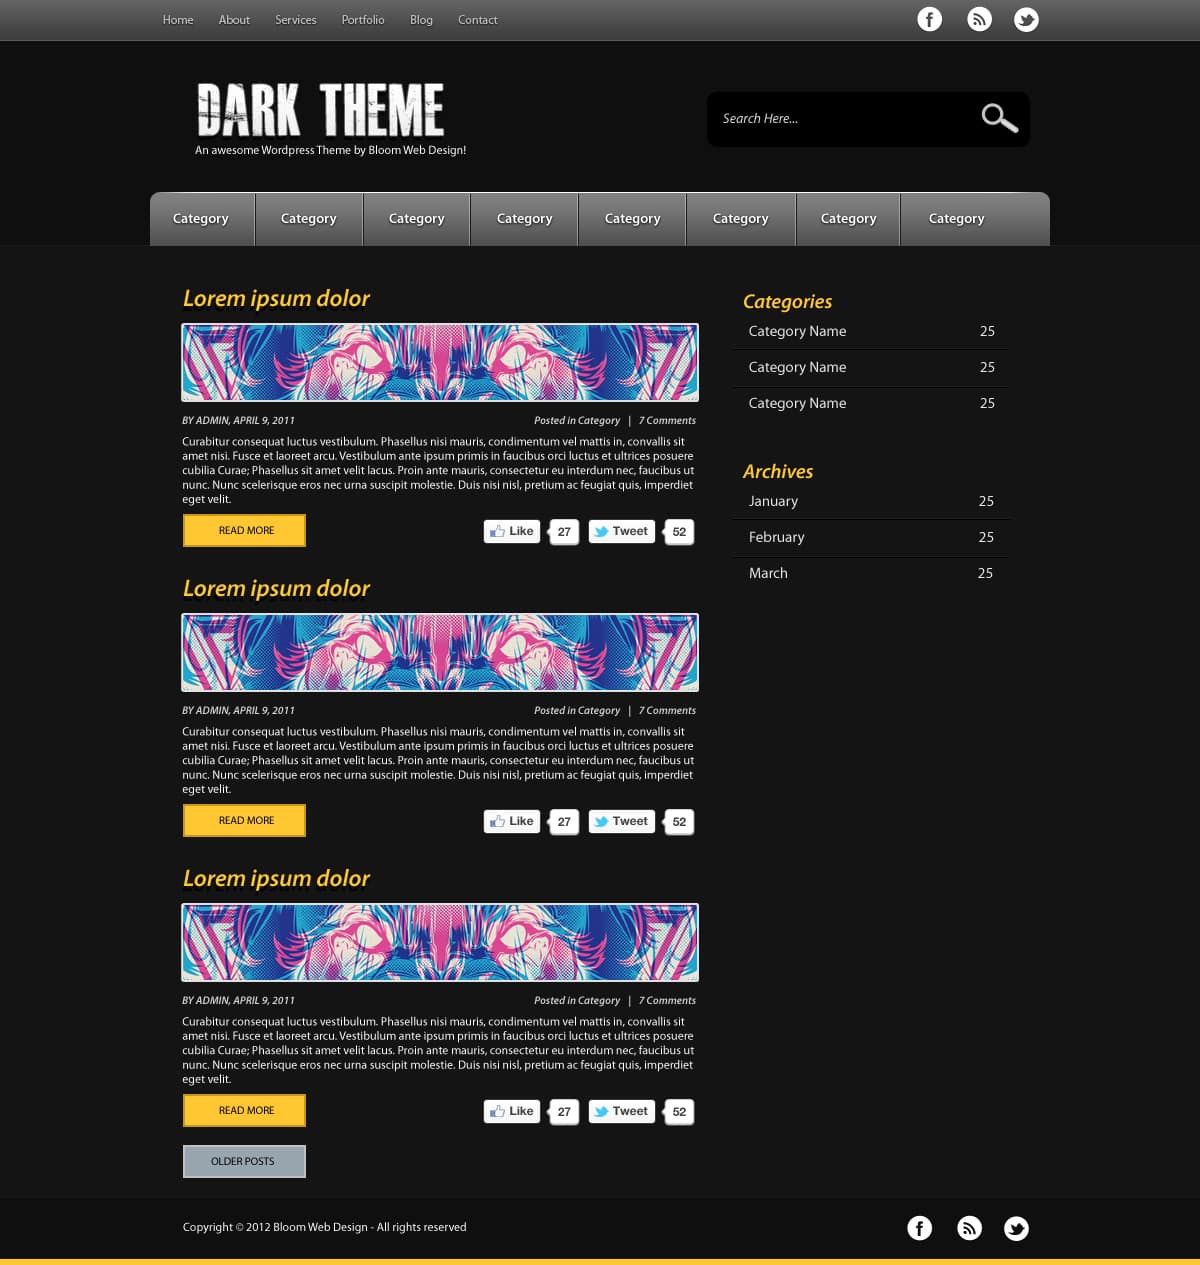
Final Result
Canvas Preparation
1. Create a new document with the settings below:

2. Press CTRL+R to bring the rulers up around the canvas & drag out 2 vertical lines like below. Go to Image > Canvas Size and enlarge the canvas using the settings below. These 2 lines will be our content border when creating the WordPress Theme.

3. Next grab the Rectangle Tool. and draw the header & content background using the colours below.

4. Using the Rectangle Tool again, draw a top bar for the first menu, double click on the layer to go into Blending Options and put in the following settings:

5. Using the font below, write out the top menu, website name & slogan.

6. Place the social icons on the top bar. Next using the Rounded Rectangle Tool, draw a black shape for the search bar, type in ‘Search Here’ using the font Myriad Pro in italics & white. Next go into the Custom Shape Tool and select the magnifying Glass and draw the shape while holding down the Shift Key (to keep the shape perfect).

7. Using the Rounded Rectangle Tool, draw the main menu. Double click on the layer to go into Blending Options and put in the following settings:

8. Using the Rectangular Marquee Tool, select the top of the main menu like below. Click on the Add Layer Mask to crop the shape down to the selected area.

9. Next select the Line Tool (1px) and draw on the top of the menu shape while holding down the Shift Key. While on the Line Layer click on the Add Layer Mask icon. Click on the Mask Layer and erase the edges of the line using a Black Soft edged brush. If you make a mistake change the colour to white and brush over the mistake to bring it back.

10. Using the font below, write out the menu using white. Double click to go into Blending Options and put in a drop shadow on the text. Next using the Line Tool, draw 1 black and 1 white line for the divider like below. Click on the white line and put down the Opacity until you’ve got a nice indent look. While holding down the CTRL Key select the 2 line dividers and drag to the new layer icon to duplicate. Place them between the menu names.

11. Next using the font below, write out some post details. Select the Rounded Rectangle Tool and draw the featured image area in white. Double click on the shape to go into Blending Options and put in the Stroke.

12. Select the image you want as the featured image example, and place the image layer directly over the white shape. Right click your image and Create Clipping Mask, this will crop the shape down.

13. Using the Rectangle Tool, draw the Read More button using the colour below, go into Blending Options and put in a Stroke. Write out Read More in Myriad Pro.

14. Next place on the share social Icons.

15. Click on the first layer of the post section, hold down the Shift Key and click on the last post layer to select all of the layers. Drag the layers onto the Folder Icon to place them in a folder, then duplicate the post folder and place each post neatly down the page. Create a Older Posts button using the same style as the Read More button.

16. Using the font below, write out the Categories section.

17. Using the Line Tool, draw 2 black and white lines for the dividers. Click on the white line and put in Opacity down so that is looks like a slight indent. Duplicate the line dividers and place between each category.

18. Using the method in step 15, duplicate the category section, and move to down. Edit the names to create the Archives section.

19. For the footer, draw the coloured block across the bottom using the Rectangle Tool.

20. Lastly write on some copyright details and put in some social icons to finish the footer.

Final Result


