Design a Professional E-Commerce Template – Photoshop Tutorial
In this tutorial I’ll teach you how to design a sleek & professional looking E-Commerce Layout in Photoshop!
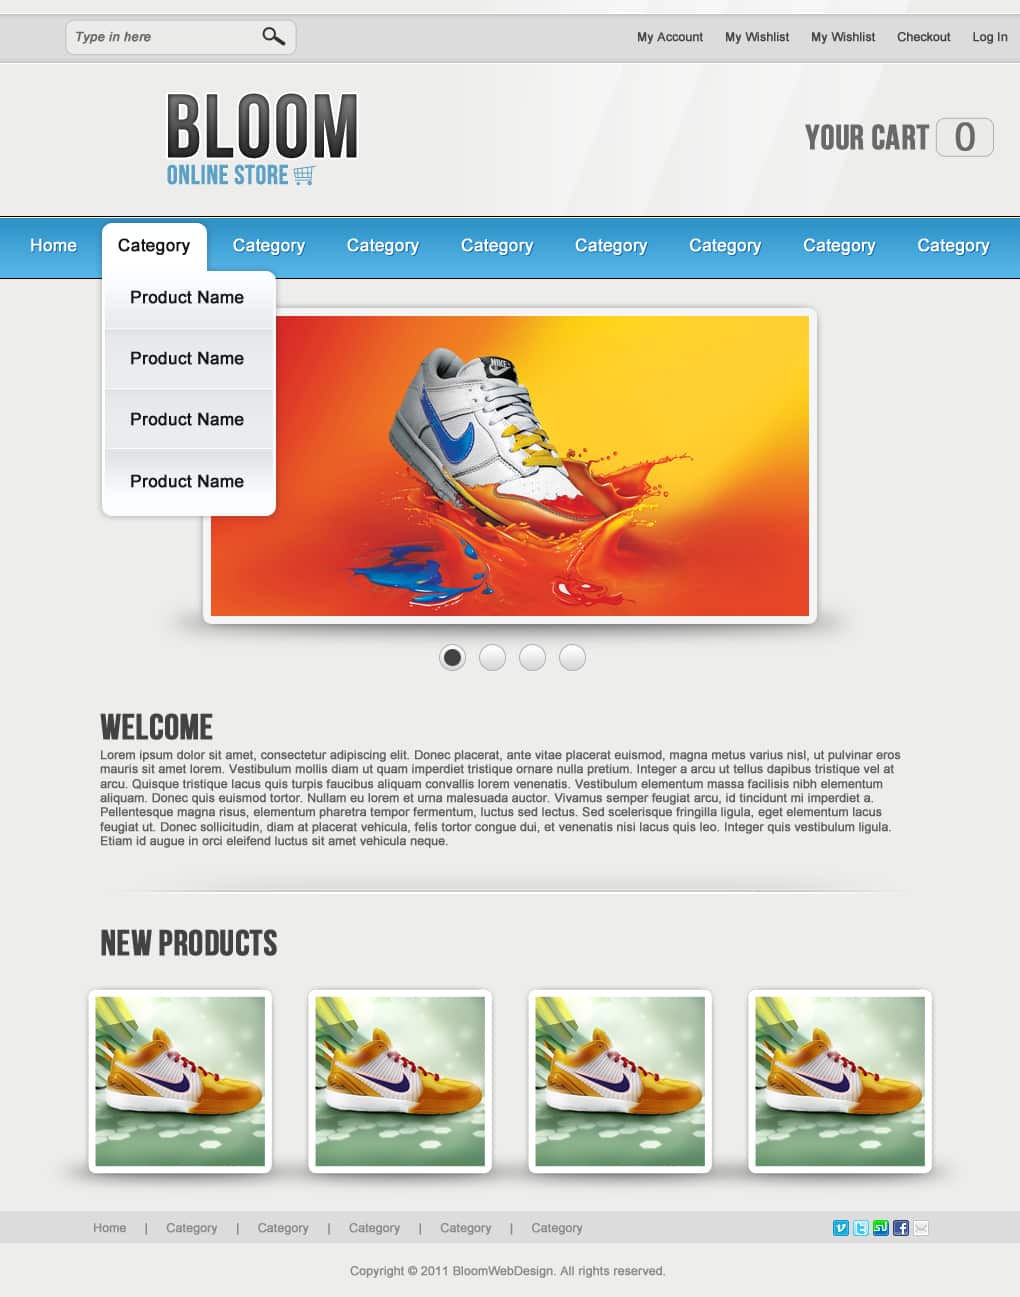
Final Result
1. Create a new document that’s 1020×1297 and fill in the background using the colour below:
 
2. Using the Rectangle Tool draw a shape across the page for the top bar using the colour #dcdcdc. Double click on the layer to go into Blending Options and put in the following:
 
3. On the right side, using the Font Tool write out the top navigation links using the Font settings below:
 
4. On the left side, using the Rounded Rectangle Tool, draw the search box using the colour #ebebe9, double click into Blending Options and put in a Stroke.
 
5. Next go into the Custom Shape Tool, and select the Mgnifying Glass shape. While holding down the shift key (to keep the shape perfect), draw on a small Magnifying Glass using the colour #323232 and place it on the search box. Next write out ‘Type in Here’ using the font below.
 
6. Using the font Bebas Neue, write out your business name, and then again for the slogan. Double click on the Business Name layer to go into Blending Options and put in the following below. Lastly go into the Custom Shape Tool, select the Shopping Trolley Shape & draw in next to the slogan using the same blue colour.
 
7. Next get the Rectangle Tool and draw a horizontal rectangle like below using the colour white. Rotate the rectangle by press CTRL+T and rotating an edge. Next set the Blending Mode to Multiply so it’s invisible, double click on the layer to go into Blending Options and put in the setting below.
 
8. Duplicate the rectangle shape (by dragging it to the new layer icon) until you have a nice effect on the banner like below.
 
9. Next select the Rounded Rectangle Tool and draw out a box like below for the Item numbers. Using the font Bebas Neue, write out ‘Your Cart’, next using the font Arial, write out the number.
 

10. Using the Rectangle Tool, draw out the main menu across the layout. Double click to go into Blending Options and put in a Gradient Overlay.
 
11. Using the 1px Line Tool, draw 3 lines (while holding down the shift key), along the menu.
 
12. Using the font below, write out the menu titles in the colour white. Double click into Blending Options and put in a Drop Down Shadow on the menu text.
 
13. For the Drop Down menu, draw the first shape using the Rounded Rectangle Tool. Draw the next shape below using the Rounded Rectangle Tool again. While holding down the CTRL key, select the 2 layers that make the Dropdown Menu, right click and Convert to Smart Object (this will turn them into 1 object). Double click the new shape to go into Blending Options and put in the setting below.
 
14. Next write out the Dropdown Menu Links.
 
15. Using the Rectangle Tool, draw a white shape under the first link. Set the Blending Mode to Multiply so it’s invisible, double click on the layer to go into Blending Options > Gradient Overlay and put in the setting below. Duplicate the gradient shape, and flip over by pressing CTRL+T and flip. Go into Blending Options on the duplicated layer and reverse the Gradient Overlay angle.
 
16. Duplicate the 2 Gradient Shapes and place them like below.
 

17. For the Slider, draw a shape like below using the Rounded Rectangle Tool in the colour white. Double click into Blending Options and put in the following settings:
 
18. Select an image example you want to be in the slider & place the image over the slider shape. Right click the image layer & Create Clipping Mask. This will crop the image down to the white shape below.
 
19. Create a new layer underneath the slider & select the Elliptical Marquee Tool. Draw a thin oval shape underneath the slider using a dark grey. Next go into Filter > Blur > Gaussian Blur and put in 13.
 
20. Next select the Ellipse Tool and while holding down the shift key draw a small circle. Double click on the circle layer to go into Blending Options and put in the settings below. Duplicate the circle 3 times placing them evenly like below. Again draw a circle, but this time smaller using the dark grey colour below, and place on one of the larger circles.
 
21. Write out some ‘Welcome’ text, I’m using the font Bebas Neue for the heading, and Arial for the paragraph text.
 
22. Using the Rectangular Marquee Tool, draw out a very thin line. Create a new layer and fill the line using the colour #c9c9c9. Using the same method, draw another thin line underneath the first one and fill it with the colour #fdfdfd on the same layer. Get a soft edged eraser tool and slightly erase the edges so it looks like it’s fading out.
 
23. Next using the Rectangle Tool, draw a shape above the fades lines using the colour white. Set the Blending Mode to Multiply so the rectangle is invisible, then double click into Blending Options and put in the following Gradient Overlay.
 
24. For the Product section, write out the title ‘New Products’. Next select the Rounded Rectangle Tool, and draw a white square while holding down the Shift Key. Double click into Blending Options and put in the settings below. Select the product image you want as the example, place it directly over the square shape, right click and Create Clipping Mask so it crops down to the shape. Using the same method as Step 19, put some shadows underneath each product box.
 

25. Using the colour #dcdcdc, draw a thin shape for the Footer details using the Rectangle Tool. Next write out the Menu & Copyright Details.
 
26. Lastly grab this Mini Social Icons and place the Social Icons you want on the Footer.

Final Result


