Design a Textured Email Template in Photoshop (Free PSD)
In this tutorial we’ll be learning how to make a Textured Email Template using Adobe Photoshop. To make this template, we’ll be creating a textured pattern from scratch, using various shapes, a wooden texture, blending options and helpful tips and techniques.
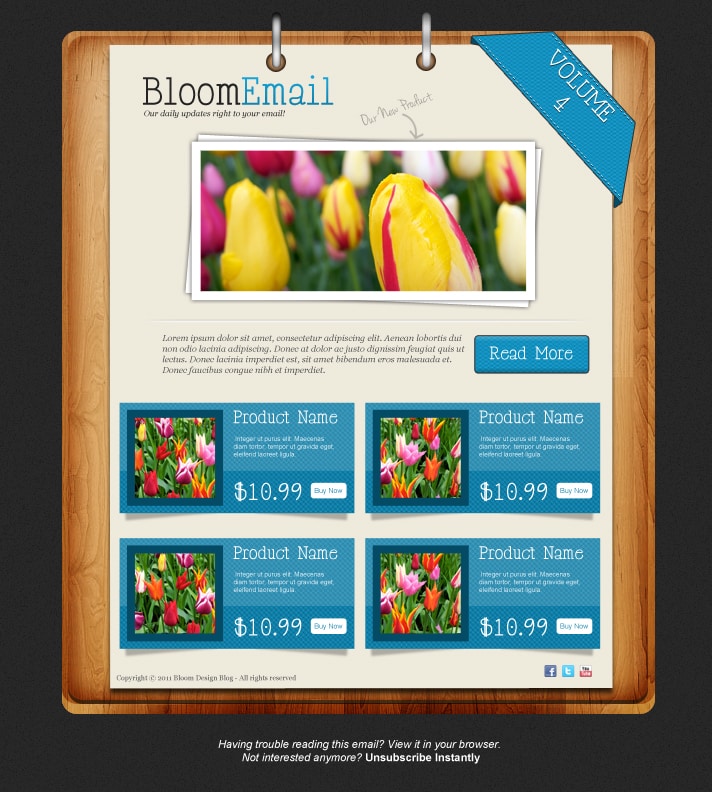
Final Result
Resources:
- Wooden Texture
- Mini Social Icons
- Happy Phantom Font
- Jenna Sue Font
- Hand Drawn Arrow Photoshop Brushes
Texture Pattern
1. For the first Pattern, create a new document that’s 12x12pixels and white background. Using the Rectangle Tool (black) create the shape below. Hold down the CTRL Key and select the rectangle layers, press CTRL+E to merge them together. To turn it into a pattern go to Edit > Define Pattern.

Email Template
2. Create a new document that’s 700x800px. Fill in the background using the colour below. Create a new layer, fill it white and set the Blending Mode to Multiply so it’s invisible. Go into Filter > Noise > Add Noise.

3.Using the Rounded Rectangle Tool (15px Radius), draw out the shape below. Copy & Paste the wooden texture onto the canvas, and if you want, shrink the texture by pressing CTRL+T and drag a corner down while holding down the shift key. Go back to the shape layer, hold down the CTRL Key and click on the layer thumbnail to bring up the marquee, go back to the wooden texture layer and click on the Add Layer Mask icon to crop the texture down to the shape.

4. Double click on the texture layer to go into Blending Options and put in the following options below:

5. Using the Rounded Rectangle Tool again, draw a smaller shape like below using white and set the Blending Mode to Multiply. Double click into Blending Options and put in the following options below to give the wooden texture some depth.

6. Bring up the marquee around the main shape again like in step 3. Create a new layer and using a soft edged white brush, draw on the bottom corners of the wooden texture. Move the marquee up by pressing the Up Arrow (make sure you’ve selected the Rectangular Marquee Tool as you’re doing this) then press delete to remove the unwanted white area & set the Blending Mode to Soft Light.

7. Repeat step 6 but with the dark tone instead.

8. Using the Rectangle Tool, draw out the shape below. Double click into Blending Options to give it a nice shadow effect.

9. Using the font below, write out your email template name & slogan. I’ve placed a light black to white gradient on the title text in Blending Options.

10. Next using the Rectangle Tool, draw out a square for the main image using the colour white. Go into Blending Options and put in the following options I have below. Select the image you want directly over the rectangle layer. Right click your image and Create Clipping Mask, this will crop the image down to the white rectangle shape.

11. Duplicate the rectangle shape by dragging it to the new layer icon. Rotate the bottom rectangle by pressing CTRL+T and rotating a corner to add a nice effect.

12. Using font Jenna Sue and the Hand Drawn Arrow Brushes, write something like below and draw a small arrow pointing at the image using the colour #929292.

13. Using the Pen Tool, draw out the main ribbon shape using the blue colour below. Go into Blending Options and put in the following options below using the pattern you created.

14. Using the font Happy Phantom, write out the volume number of the email template . Put in a Drop Down Shadow below and the rotate the text by pressing CTRL+T and rotating a corner.

15. Using the pen tool again, finish off the ribbon drawing the corners bits using the dark blue colour below and putting in the same stroke as the main ribbon in Blending Options.

16. Using the Ellipse Tool, draw a circle while holding down the Shift Key (to keep the shape perfect) using the colour I have below. Double click on the circle to go into Blending Options put in a Inner Glow. Duplicate the circle move it to like below. Next select the Rounded Rectangle Tool and draw the binders. Double click into Blending Options and put in the following options below:

17. Create a new layer, select a 1px solid brush (black) and draw a line for the divider while holding down the Shift Key to keep it straight. Set the opacity to 27%. Draw another line but white. Using a Soft Edged eraser, erase the edges of the lines for a nice effect.

18. Using the font below, write out some introduction text on the email template.

19. Grab the Rounded Rectangle Tool and draw a button to go beside the text using the colour below. Put in the Blending Options below. Write out Read More in the Happy Phantom font.

20. Next draw a box using the Rectangle, and put in the blending options below.

21. Using the Rectangle Tool again, and draw a black rectangle shape like below and rotate on both sides. Press CTRL and select the 2 black rectangle shapes, right click > Rasterize Layers, then right click again and Merge Layers. Go into Filter > Blur > Gassian blur and put in 1.9. Set the opacity to 33%.

22. Draw a white rectangle shape over the blue box and set the opacity to 15%. Again with the Rectangle Tool, draw a white shape for the product thumbnail. Double click into Blending Options and put in a Stroke. Place the image you want directly over the white box, right click and Create Clipping Mask.

23. Using the fonts below, write out the product details. I’ve just drawn on a white button behind the Buy Now text using the Rounded Rectangle Tool.

24. Select the first product box layer, hold down the shift key and select the last product box layer to select all the layers. Drag them to a folder (to make it neater) then duplicate the folder 2 more times and place all the boxes evenly like below.

25. On the bottom write out the Copyright details and place some of the Mini Social Icons in the opposite corner.

26. Lastly write out the email information.

Final Result


