Design a Trendy Dark Portfolio Layout in Photoshop
Learn how to design a eye catching wooden textured Portfolio Layout in Photoshop!
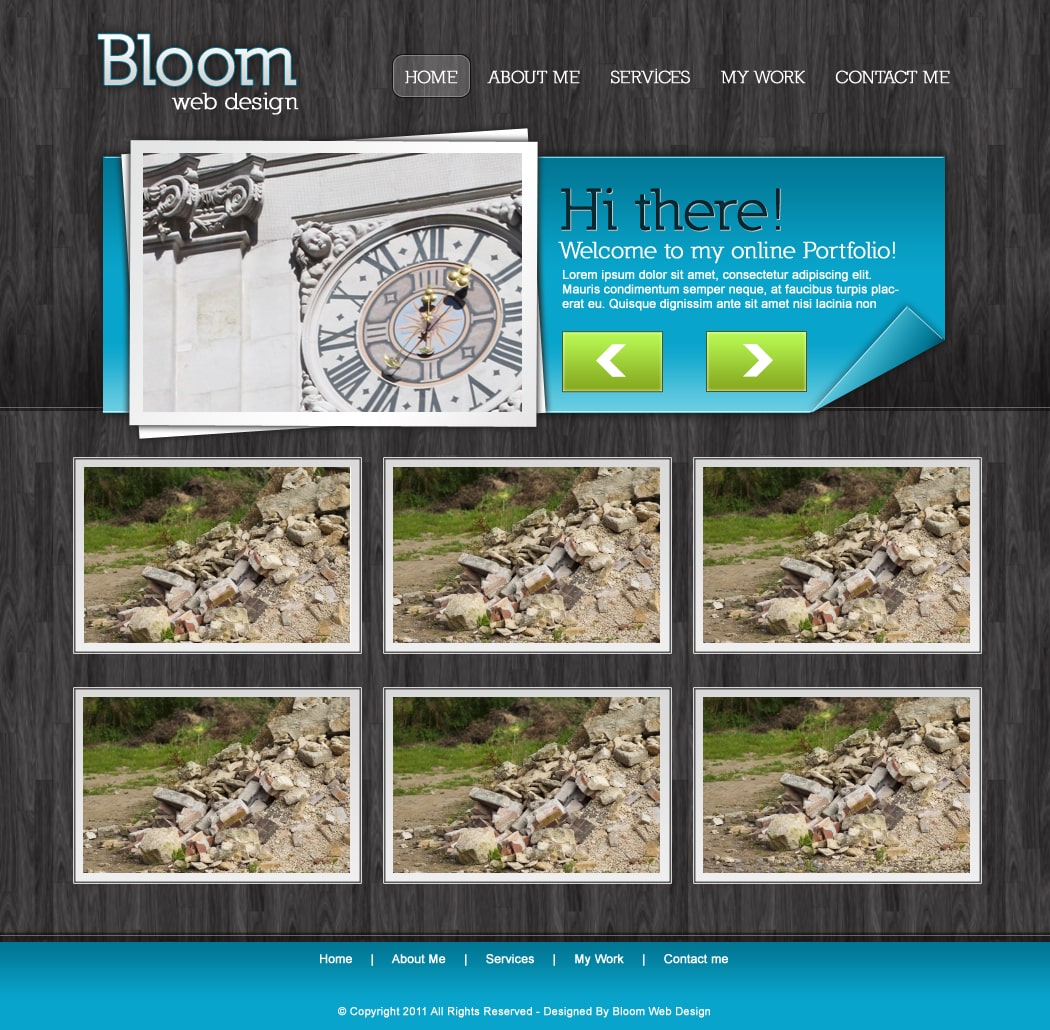
Final Result
1. First Download and install these Tileable Wood Patterns. Create a new document that’s 1050×1030 pixels Double click on the background to unlock, then again to go into Blending Options and put in the options below.

2. Using the Rectangle Tool, draw a shape like below across the layer in the colour white. Set the Blending Mode on the layer to Multiply so it’s invisible, double click into Blending Options and put in the settings below:

3. Using the line tool (1px & white), draw a line across the layout while holding down the shift key (to keep the line straight).

4. Holding down the shift key, select the rectangle & line layers, right click and Duplicate Layers (or drag them to the new layer icon). Place the duplicated layers on the footer area. I’ve changed the direction of the shadow by going into Gradient Overlay  and changing 90 to -90.

5. Next write out the name of your website, I’m using the font Nilland. On the heading layer, double click into Blending Options and put in the following.

6. Next write out the menu names in the font Nilland using the colour white. Using the Rounded Rectangle Tool draw a shape around one of the menu names for a Hover Example using the colour white. Set the Blending Mode to Multiply so it’s invisible, then double click into Blending Options and put in the settings below.

7. For the slider, draw a shape using the rectangle tool. Double click into Blending Options and put in the following settings:

8. Next using the Polygonal Lasso Tool draw around the slider leaving the right bottom corner out. Make sure your on the slider layer, then click on Add Layer Mask to crop off the corner.

9. Using the Pen Tool draw the folded corner shape, double click to go into Blending Options and put in the following settings:

10. Using the line tool (white 1px) draw on the edges of the slider where I’ve pointed at below.

11. Next draw the shape below using the rectangle tool in the colour white. To rotate the shape press ctrl+t and rotate a corner. Double click to go into Blending Options and put in the Outer Glow setting below. Duplicate the shape and make it straighter by press ctrl+t and rotating, double click into Blending Options and put in the Gradient Overlay option below.

12. Draw another smaller white rectangle to go in the center in the colour white. We’ll be placing our slider image here later on in the tutorial.

13. Write out a heading for your slider, I’m using the font NIlland again. Double click into Blending Options and put in the settings below to add a nice effect.

14. Next write out some more slider information in the colour white.

15. Next draw a button using the rectangle tool, double click into Blending Options and put in the settings below. Choose an arrow from the Custom Shape Tool and place it on the button. Duplicate the button layers, press ctrl+t and flip the button over.

16. For the portfolio, draw the image thumbnail shape like below using the rectangle tool. Double click into Blending Options and put in the following settings:

17. Draw another smaller white shape inside the thumbnail, ready for the image. Duplicate the image thumbnails and place evenly on the website layout.

18. Draw the footer shape using the rectangle tool, double click into Blending Options and put in the Gradient Overlay below.

19.  Write out some copyright & menu details.

20. Lastly get an image you want on the slider and place it over the white rectangle you created earlier, click click the layer and click Create Clipping Mask. This will crop the image down to the size of the white rectangle.

21. Do step 20. for the following portfolio images.

Final Result


