Design Babushka Dolls in Illustrator & Photoshop
Learn how to create a Babushka Doll in Illustrator with Eastern European Patterns and add some final touches in Photoshop!
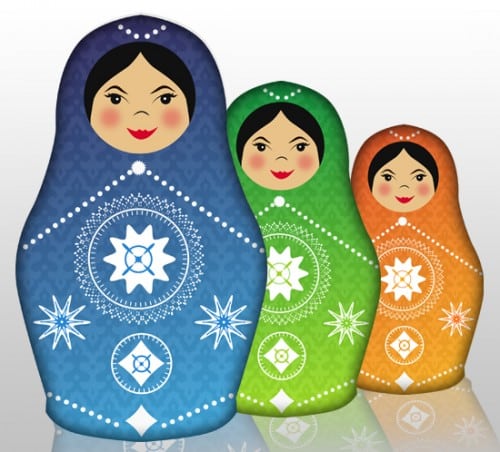
Final Result
Illustrator
1. Create a new document in Illustrator that’s 500×600 pixels. Press ctrl+’ (or go to View > Show Grid), get the pen tool and draw half of the Babushka Doll using a fill colour of none, and a stroke colour of black. Duplicate the shape by holding down the alt key and pulling the shape away. Select the duplicated shape with the Selection Tool and flip it across, align the 2 shapes, go into the Pathfinder (Window > Pathfinder or shift + ctrl + f9) and press the ‘Unite’ Icon. If you have any unwanted lines still showing remove them with the delete anchor point tool.

2. Next change the colour to the shape to Fill Colour as a blue Gradient (colours are below) & stroke to none. Next get the Ellipse tool and holding down the shift key draw a circle for the face using the fill colour below.

3. Next duplicate the face shape (using the previous method) and pull it else where on the canvas. Using the pen tool draw some hair over the face, to make the hair stay the shape of the circle select the 2 shapes, go to the Pathfiner and click on Intersect.

4. Put the hair on the doll, duplicate & flip the hair to the other side using the previous method. Using the pen tool draw some eyebrows.

5. Using the pen tool draw the eyelashes,then using the ellipse tool draw an eye holding down the shift key.

6. Next draw some pink circles for the cheeks using the Ellipse tool. Hold down the shift key and select the 2 circles. go to Effect > Blur > Gaussian Blue & put in the settings below to make blushing cheeks. Using the pen tool draw some lips next. Next draw a button nose with the pen tool.

7. Now for some patterns! Using the ellipse tool draw a white circle, go into Effect > Distortion & Transform > Zig Zag & put in the settings below.

8. Next draw 2 circles again with a fill colour of none, and a stroke of 2px. On the inner circle go to the stroke window & put in the settings below: next draw a blue (#2484D3) circle in the middle of the star shape, with the blue circle selected go to Effect > Distort & Transform > Pucker & Bloat.

9. Next draw a small white circle, go to Effect > Distort & Transform > Zig Zag and put in the setting below to make it a star.

10. Next using the line tool draw a line like below, with the fill colour white, and the stroke colour white, go into the Stroke window and put in the following settings:

11. Due the previous step as many times as you like to get a nice look.

12. Next draw a circle again, go into Effect > Distort & Transform & Pucker & Bloat. Place the diamond shape on the bottom where the 2 lines meet.

13. Select all the shapes while holding down the shift key of the main ‘symbol’ you create earlier, Pull the selected layers away to duplicate. remove the white rounded star shape and draw a circle, go into Effect > Distort & Transform > Pucker & Bloat to make this symbol look a little different.

14. Next draw a circle around the main symbol with a fill colour of none. and a stroke colour of white, go into the stroke window and put in the settings below to make the stroke small circles. Next go into Effect > Distort & Transform > Zig Zag, this will give it a nice pattern.

15. Next draw 2 white circles, with them both select go to Effect > Distort & Transform > Zig Zag & put in the following settings to make them stars. Next draw a smaller circle in the center of them with a fill colour of none and a stroke colour of #2484D3, go to Effect > Distort & Transform > Zig Zag.

16. Next duplicate the main blue body, go to Window > Swatch Libraries > Patterns > Decorative > Decorative_Orniment, I’ve chosen the pattern I’ve circled below as the fill colour, and set the transparency to 12%.

17. I’ve decided to save the blue doll and make a green doll and an orange doll. You only have to change the colours to what you want then save each colour individually.

Photoshop
18. Next open a new document in photoshop that’s 550x500px. Open the 3 dolls, copy and paste them onto the photoshop document you just created. Hold down the shift key and select all of the doll layers, press ctrl+t and drag a corner down while holding down the shift key to shrink the size. Next double click on each doll to go into Blending Options, go into Inner Glow and put in the settings:

19. Put all the doll layers into a folder by dragging them to the folder icon. Duplicate the folder, right click the duplicated folder and Convert to Smart Object. Press ctrl+t and flip the dolls upside down, drag them so they’re under the dolls as a reflection. Set the opacity to 42%.

20. Next double click on the white background layer into Blending Options > Gradient Overlay and put in the following settings:

Final Result


