Design a Hosting Website in Photoshop
Learn how to design a Hosting Website/Layout in Photoshop!
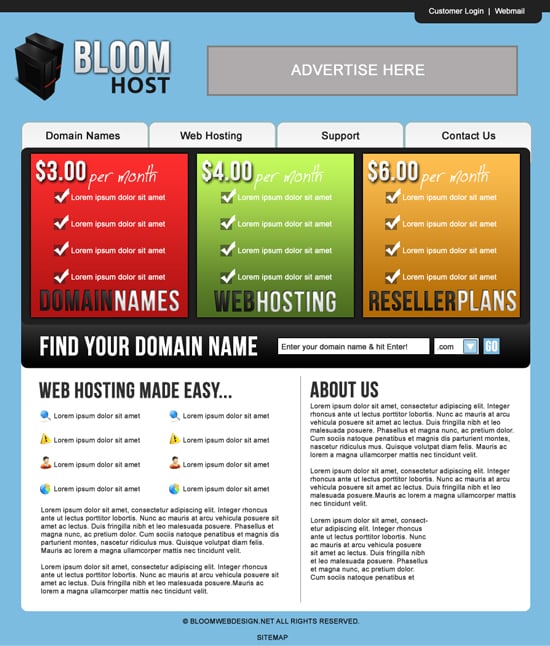
Final Result
1. Create a new document that’s 900×1050 pixels. Using the Paint Bucket Tool fill in the background to the colour below:

2. Using the colour #212121 draw a shape across the top of the layout like below using the rectangle tool, then draw a tab like below using the rounded rectangle tool. Using the font below write our Customer Login | Webmail in the colour white.

3. Choose a hosting icon you want from Icon Finder, then write out the Business name using the font Bebas Neue & Frutiger Sain.


4. Press ctrl+r to bring up the rulers & drag out 2 blue lines from the rulers and place them like below. If you want to move or remove the lines do this using the Move Tool. These blue lines will be where our guide to where the container area ends.

5. Using the rounded rectangle tool draw a shape for the button. Double click the layer to go into Blending Options, put in the following:

6. Write out the button name using the font below. Duplicate the button layers by selecting the 2 while holding down the ctrl key and drag them to the new layer icon. Duplicate them until you have as many buttons as you like.

7. Using the rounded rectangle tool draw the box below in dark grey.

8. Using the rectangle tool draw 3 boxes like below. Double click on each to go into Blending Options, put in the colours in Gradient Overlay, then put in an outer glow.

9. Using the font Bebas Neue write out some feature names, I’ve made the first colour drak grey and the second word white. Double click into blending options and put in the settings below for each heading:

10. Next write out the prices & per month (which I’ve written in Jellyka CuttyCupCakes), double click on the prices to go into Blending Options and put in the following:

11. Using the rectangle tool, hold down the shift key (to key the shape perfect) and draw a black square. Make the opacity for the square 50%. Now go into the Custom Shape tool and choose the tick shape. Hold down the shift key and draw a white tick and place it in the box.

12. Write out the plan features and duplicate the box/ticks like below.

13. Now using the rounded rectangle tool draw a shape like below, make sure the shape is under the plans box so the top is hidden.

14. Write our Find Your Domain Name (or whatever you want), then using the rectangle tool draw out 2 white boxes like below with a 1px black stroke (in blending Options).

15. Using the rectangle tool again, hold down the shift and draw a square using the fill colour and stroke colour below. Go into Custom Shape tool and select the upside down triangle, draw a white triangle while holding down shift.
Using the font below write out what I have below (or what you like!).

16. Draw another square using the same colour as the dropdown button and type in GO in Bebes Neue.

17. Next choose some icons you like from this Web Application Icon Set and write out some info like below.

18. Using the line tool draw a line to separate the two sides while holding down the shift key, then write out some more information. I’ve placed a hosting icon from here.

19. On the bottom write out some copyright info in Arial.

20. if you would like to place an Advertise Here box, draw a shape like below using the rectangle tool, double click into Blending Options and put in a stroke. Then write out Advertise Here in the font Arial.

Final Result


