Design a Nike Shoe Advert using Photoshop
Learn how to create an artistic Nike Shoe Advert using Adobe Photoshop. We’ll be creating this advert using a variety of Textures, Brushes, Shapes, Pen Tool, images and various techniques!
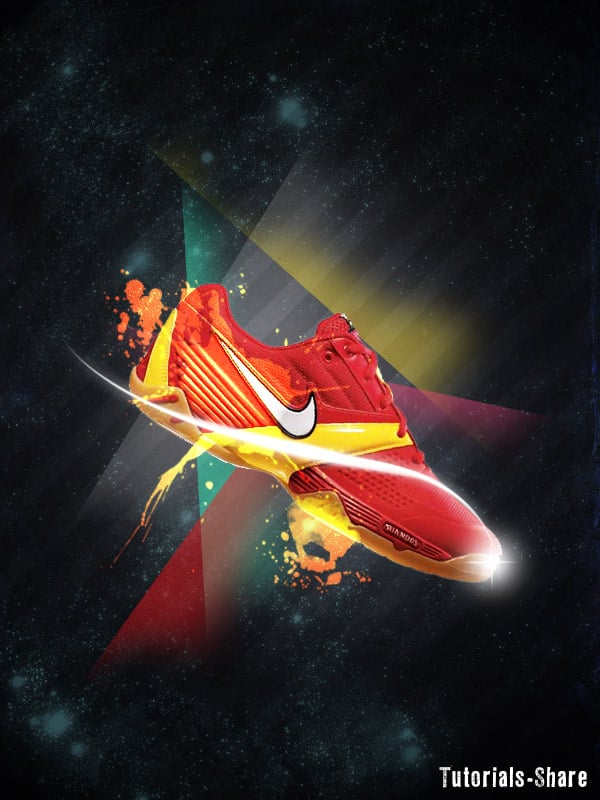
Final Result
Resources:
1. Create a new document that’s 600×800 pixels & white background. Double click on the background Layer to go into Blending Options and put in the settings below:

2. Copy & Paste the paper texture onto the canvas. Press CTRL+T and rotate an edge so the image is vertical. To make it smaller press CTRL+T again and drag a top corner down while holding down the Shift Key (to keep the image perfect). Set the Blending mode to Divide.

3. Create a new layer & using the colour, draw on the Stars using the Photoshop Star brushes. Set the Opacity to 55%.

4. Create another new layer and using a medium soft edged brush draw on some white highlights in the center of the canvas. Set the opacity Blending Mode to Soft Light and the opacity to 50%.

5. Go into the Custom Shapes Tool and select the Diagonal Lines Shape. While holding down the Shift Key draw the shape onto the canvas using the colour black. Set the Opacity to 15% and duplicate the shape by dragging it to the new layer icon. Move the duplicate lines down to create double the lines

6. Copy and Paste the Nike Show onto the canvas. Make the image smaller and rotate by using the CTRL+T method. To remove the white background, select the Magic Wand Tool, click on the white background and press delete.

7. To make the shoe stand out more, go into Image > Adjustments > Brightness/Contrast and put in the settings below:

8. Create a new layer, select a soft edged brush (white colour) & brush on a spot on the end of the show for a glow.

9. Using the Line Tool (1 px) draw 1 horizontal & 1 vertical like like below. Click the Add Layer Mask icon on both line layers. On the Mask Layers, erase the edges of the lines using a soft edged black brush. Place the 2 lines over the white spot for a additional glow effect.

10. Select the Pen Tool and change the settings ‘Paths’ instead of ‘Shape Layers’. Draw a curvy line like below for the streak.

11. Go into Window > Brush  (F5) and put in the settings below for the streak.

12. Set the colour to white. In the Layers Panel, create a new layer then go into Paths. Click on the arrow in the top corner and select Stroke Path. A box will appear, select the Tool as Brush and press OK to create a nice streak.

13. Go back into the Layers panel, double click on the streak to go into Blending Options and put in an Outer Glow.

14. Select the Rectangle Tool and draw a Rectangle shape beneath the shoe layer. Click on Add Mask Layer on the shape, select a soft edged brush with the colour black. Paint the edges of the mask layer so they fade away to get a nice effect.

15. Using the same method create other shards of colour for the background.

16. Create a new layer, using a Splatter brush (colour #de9c2f), brush on the shoe and set the Blending Mode to Color Dodge.

Final Result


