Design a Apple Themed Website in Photoshop
Learn how to create a Apple Leopard Themed Website from scratch in Photoshop!
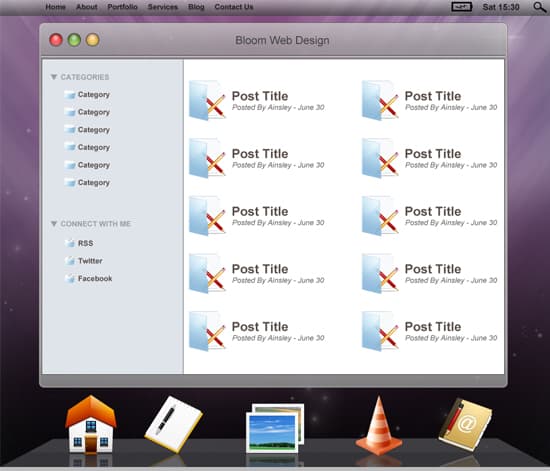
Final Result
1. Create a new document that’s 1050×900. Double click on the background to unlock it, double click again to go into Blending Options > Gradient Overlay and put in the following colours:

2. Create a new layer and fill it white, go into Filter > Render > Fibers and put in 12 & 4. Then go into Filter > Blur > Motion Blur and put in 54 angles/344 pixels.

3. Double click on the layer to go into Blending Options and put in the settings below:

4. Click on the Add Mask Layer icon (circled below) to add a mask to the layer. Adding a mask means you can edit the layer without changing the original layer. Get a soft edged eraser tool and erase the bottom part.
Duplicate the layer and erase each side of the top layers like below:

5. Next download these Star & Light Effect Brushes and put some stars in for our version of the Apple Background.

6. Next using the rectangle tool draw the top bar, double click into Blending Options and put in the following:

7. Using the rectangle tool again draw 2 more bottom bars using the colours below. Press ctrl+r to bring up the rulers around the canvas. Drag out 2 lines like below as a guide. On the larger shape press ctrl+t to make it transformable, while holding down the ctrl key move each top corner to each blue line. To remove or edit the ruler lines use the Move Tool.

8. Next select the platform by holding down the ctrl key and clicking on the layer thumbnail, select the rectangular marquee tool and remove part of the highlight shape by holding down the alt key and selecting over the bottom of the shape. Create a new layer and fill the highlighted shape white. Set the opacity to 4%.

9. Using the rounded rectangle tool draw a box like below. Double click into Blending Options and put in the following settings:

10. Get the line tool and draw 2 lines like below while holding down the shift key (to keep the shape straight). This will add a nice 3d effect.

11. Next using the Ellipse Tool, hold down the shift key and draw 2 circles (one large and one small). Make the smaller circle white and put an outer Glow (in Blending Options) on it, place it over the larger circle. On the larger circle put an Inner Glow and a Red Gradient (in Blending Options). Duplicate the circles, place them like below and change each of the colours.

12. Next draw a white box using the rectangle tool and put in a stroke with the colour #3c3b3b.

13. Next download this Phuzion Icon Pack. Choose the icons you want to go on the platform. Put all the icons into a Folder and Duplicate the folder. On the duplicated folder press ctrl+t and flip down. Right click the layer and Convert To Smart Object, right click again and Rasterize Layer. Using the rectangle marquee tool remove the bottom part of the icons and set the opacity to 23% on the layer to make a nice reflection.

14. Using the rectangle tool draw a shape for the sidebar using the colour below, then using the line tool draw a line using the colour below.

15. Next write out the Categories. Go into the Custom Shape Tool and choose the upside triangle as the dropdown icon.

16. Next select a Folder icon from the recent Icons you downloaded and place it on the content section. Write out some post and post detail examples.

17. Hold down the ctrl key and select all of the post example layers, drag them to the new layer icon to duplicate and move them. Do this until they fill the page.

18. Next select another folder icon, rotate the folder icon like below by pressing ctrl+t and rotating. While the icon is transformable make the icon smaller by holding down the shift key and dragging a corner down.

19. Next write out the Day & Time of the top bar. For the battery draw a white rectangle using the rectangle tool and change the Blending Mode to Multiply so it’s invisible, double click into Blending Options and put in the Stroke settings below.
Next go into the Custom Shape Tool and select the lightning shape for the battery, and the magnifying glass shape for the search button.

20. Using the same method as the Categories, write out Connect with me and put in some links.

21. Lastly write out some menu links.

Final Result


